
If your garage is attached to your house, an uninsulated garage door is often the single biggest source of heat loss in that part of the home. Steel and aluminum doors conduct cold straight through, and older doors frequently have gaps around the panels that let drafts pour in. The good news is that you can insulate a garage door yourself in an afternoon without touching drywall, siding, or hiring a contractor — as long as you pick the right kit for your door type and understand what R-value actually buys you.
This guide compares the common insulation kit types, walks through installation, and covers the sealing details that matter more than most people expect.
Why Insulating the Door Matters (and What It Won't Do)
A garage door is a large, thin, thermally weak panel — often just a single layer of 24-27 gauge steel or aluminum with little to no thermal break. Insulating it reduces heat transfer through that panel and can meaningfully raise the garage's ambient temperature, which helps protect pipes, keeps a workshop more usable, and reduces how hard an adjacent room's wall has to work to stay warm.
What it won't do is turn an uninsulated garage into a conditioned space. Air leakage around the door perimeter, the gap under the bottom seal, an uninsulated attic above the garage, and an uninsulated wall between the garage and the house often matter as much as the door panel itself. Treat door insulation as one part of a broader air-sealing effort, not a silver bullet.
Comparing Insulation Kit Types
Reflective Foil-Faced Foam Panels
These are rigid or semi-rigid polystyrene panels faced with reflective foil, sized to friction-fit into the recessed sections of a raised-panel steel door. They're the most common retrofit kit sold for garage doors.
- Typical R-value: Manufacturers commonly list these kits in the R-6 to R-8 range for the panel itself, though the foil facing's reflective benefit depends on there being an air gap next to it, which isn't always the case once installed flush against steel.
- Pros: Lightweight, inexpensive, no tools beyond a utility knife, doesn't add much weight to the door or its springs.
- Cons: Foil facing tears easily during install; panels can loosen and sag over months, especially in warm garages; the actual in-place R-value is often lower than the panel's rated R-value because of that lost air-gap effect.
Expanded or Extruded Polystyrene (EPS/XPS) Panel Kits Without Foil
Similar friction-fit foam panels but without a reflective face, sometimes sold pre-cut to standard door panel sizes.
- Typical R-value: Roughly R-3 to R-5 per inch of foam thickness depending on whether it's EPS or the denser XPS.
- Pros: More consistent, predictable R-value since it's not relying on a reflective air gap; slightly more rigid than reflective foil kits in some cases.
- Cons: Same friction-fit retention issues as foil kits; foam can be dented or crushed if the garage sees a lot of activity near the door.
Polyurethane Spray-in-Place or Injected Foam (Factory or Retrofit)
This is how most insulated doors are built at the factory — foam is injected between two steel skins during manufacturing, bonding to both sides and adding rigidity to the whole panel. Retrofitting this into an existing single-skin door yourself isn't practical or recommended; it's mentioned here mainly for comparison against buying a new insulated door.
- Typical R-value: Factory sandwich-construction doors commonly reach R-12 to R-18+ depending on foam thickness and door line.
- Pros: Best real-world performance, adds structural rigidity, no loose panels to fall out.
- Cons: Only available as a new door purchase, not a retrofit kit — a much bigger project and cost than a DIY kit weekend.
Batt-Style Kits (Fiberglass or Mineral Wool in a Vinyl Sleeve)
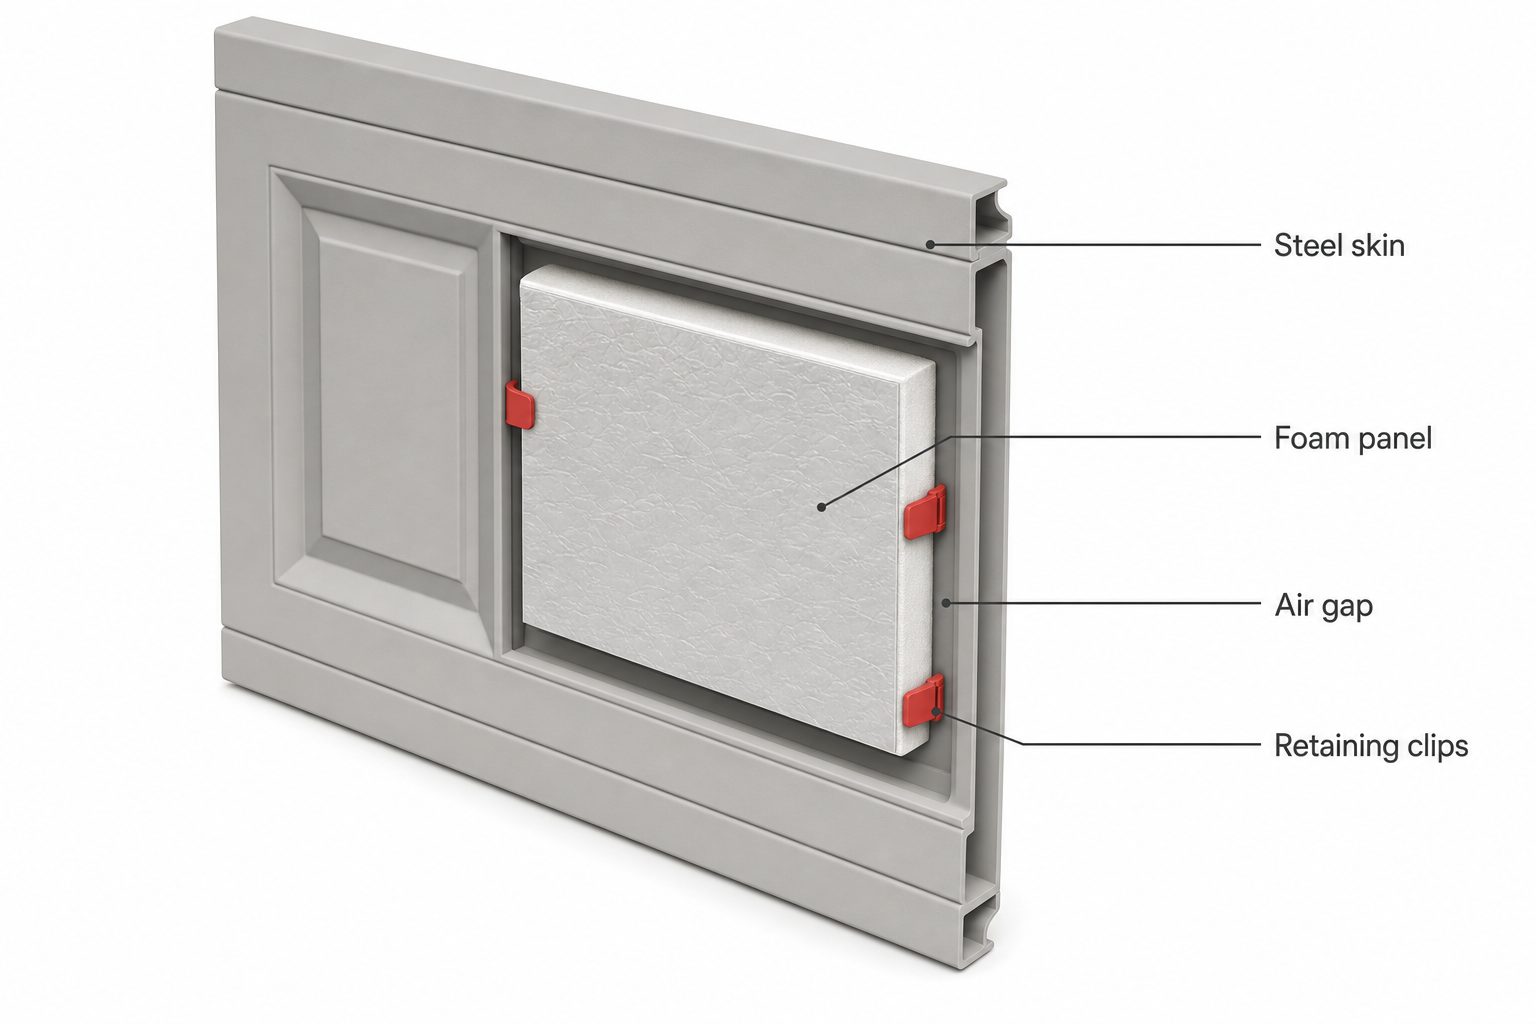
Less common than foam kits, these use pre-cut fiberglass or mineral wool batts wrapped in a vinyl vapor-retarder facing, held in place with retaining pins or clips.
- Typical R-value: Often in the R-8 range for the thicknesses typically used on garage doors.
- Pros: Doesn't sag or lose its fit the way foam panels can; fits irregular panel shapes a bit more forgivingly.
- Cons: More labor to install because it usually requires attaching retaining pins to the door face first; fiberglass handling requires gloves and a dust mask.
The R-Value Tradeoff, Practically Speaking
Higher R-value kits are usually thicker, and thickness matters for two reasons: the panels need to clear any hardware (hinges, rollers, the track) without binding, and added weight can affect spring balance on heavier doors. For most single-car and double-car steel doors, a kit in the R-6 to R-8 range is a reasonable middle ground that noticeably reduces heat transfer without needing spring adjustments. Going beyond that with thicker aftermarket foam usually means diminishing returns unless you're also addressing air sealing.
Step-by-Step: Installing a Panel Insulation Kit
- Measure every panel section individually. Raised-panel doors often have panels of two or three different sizes across the door, and doors can be slightly out of square. Measure width and height of each recessed section rather than assuming they're identical.
- Clean the panel interior. Wipe down the recessed steel with a damp cloth to remove dust and grease so retaining clips or adhesive tabs (if your kit uses them) bond properly.
- Cut foam panels to size. Use a straightedge and a sharp utility knife; score and snap for thicker rigid foam, or cut fully through for denser XPS. Cut slightly undersized (roughly 1/8 inch smaller per side) rather than force-fitting, which can bow the panel and pop it loose later.
- Install retaining clips or adhesive tabs per the kit instructions. Most kits use small plastic retainer clips pushed into pre-existing holes in the door panel, or double-sided foam tape rated for the temperature swings a garage sees.
- Press panels into place, foil or vapor-facing toward the garage interior (check your specific kit's instructions, as orientation affects performance and moisture handling).
- Work from the bottom panel up so you're not reaching over already-installed sections and risking punctures.
- Leave clearance around all hardware — hinges, roller brackets, and the center strut on wide doors — trimming foam back rather than forcing it around metal parts.
Sealing the Perimeter (Often More Impactful Than the Panels)
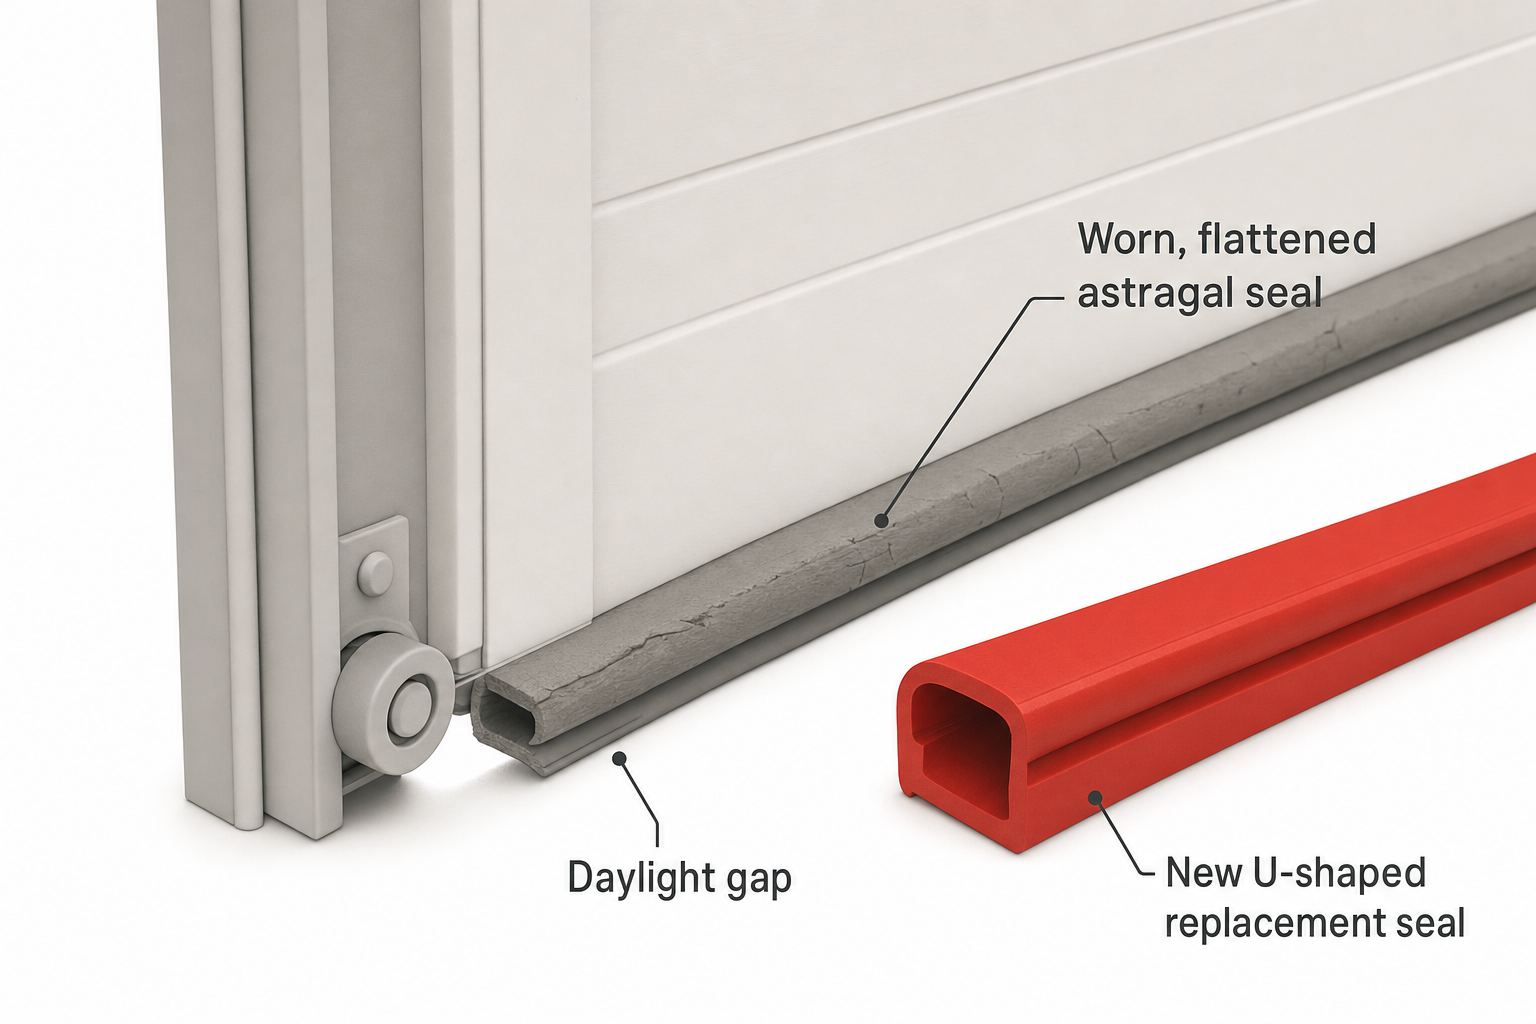
- Bottom seal (astragal): Replace a cracked or flattened rubber bottom seal; this is frequently the single largest source of visible daylight and drafts under a garage door.
- Side and top weatherstripping: Add or replace the vinyl or rubber weatherstripping in the tracks along the sides and header so the door compresses against it when closed.
- Between-panel weatherstripping: On sectional doors, thin foam or brush seals between panel sections reduce the many small gaps that add up across a door's width.
- Check the wall-to-frame gap: Gaps between the door's jamb and the surrounding wall framing are a common overlooked leak point and can be sealed with appropriate exterior caulk or expanding foam on the outside trim.
When to Consider a Full Door Replacement Instead
If your door is more than 15-20 years old, has visible rust-through, dents that prevent it from sealing evenly, or a spring system that's already due for service, a DIY insulation kit is putting effort into a door that may need replacing soon anyway. In that case, a factory-insulated sandwich-construction door will outperform any retrofit kit and is worth pricing out before spending a weekend on foam panels.
FAQ
Will insulating my garage door actually lower my heating bill? It can help, particularly if the garage shares a wall with living space or has ductwork or plumbing running through it, but the effect on whole-house heating bills is usually modest compared to attic or wall insulation upgrades; the more noticeable benefit is a warmer, more usable garage.
Do I need to insulate every panel, or just the ones near the top? Insulate the full door if possible — heat loss occurs across the entire panel area, not just near the header, and partially insulating can create uneven cold spots without much overall benefit.
Will adding insulation panels throw off my garage door's spring balance? Foam and foil kits add very little weight and typically don't require spring adjustment on residential doors, but batt-style or denser kits on very large or heavy doors can add enough weight to affect balance — if the door struggles to open or stay open partway, have a technician check the spring tension.
Can I insulate a wood garage door the same way? Yes, though solid wood doors already have more inherent insulating value than steel; panel kits still help, but check that your fastening method (adhesive vs. clips) is appropriate for wood rather than steel backing.
Is it worth insulating an unattached, detached garage? It's still useful if you use the space as a workshop or for storage of temperature-sensitive items, but the payback is more about comfort and usability than any effect on your home's heating system.