
Blinds that hang crooked are almost never a sign you need a replacement set. In most cases, one side has dropped because of uneven cord tension, a slipped tilt mechanism, or a bracket that's no longer holding the headrail level. Working through the problem in order — brackets first, then cords, then tilt mechanism — will fix uneven blinds in a single afternoon for the vast majority of mini blinds and vertical blinds.
Step 1: Check the Mounting Brackets First
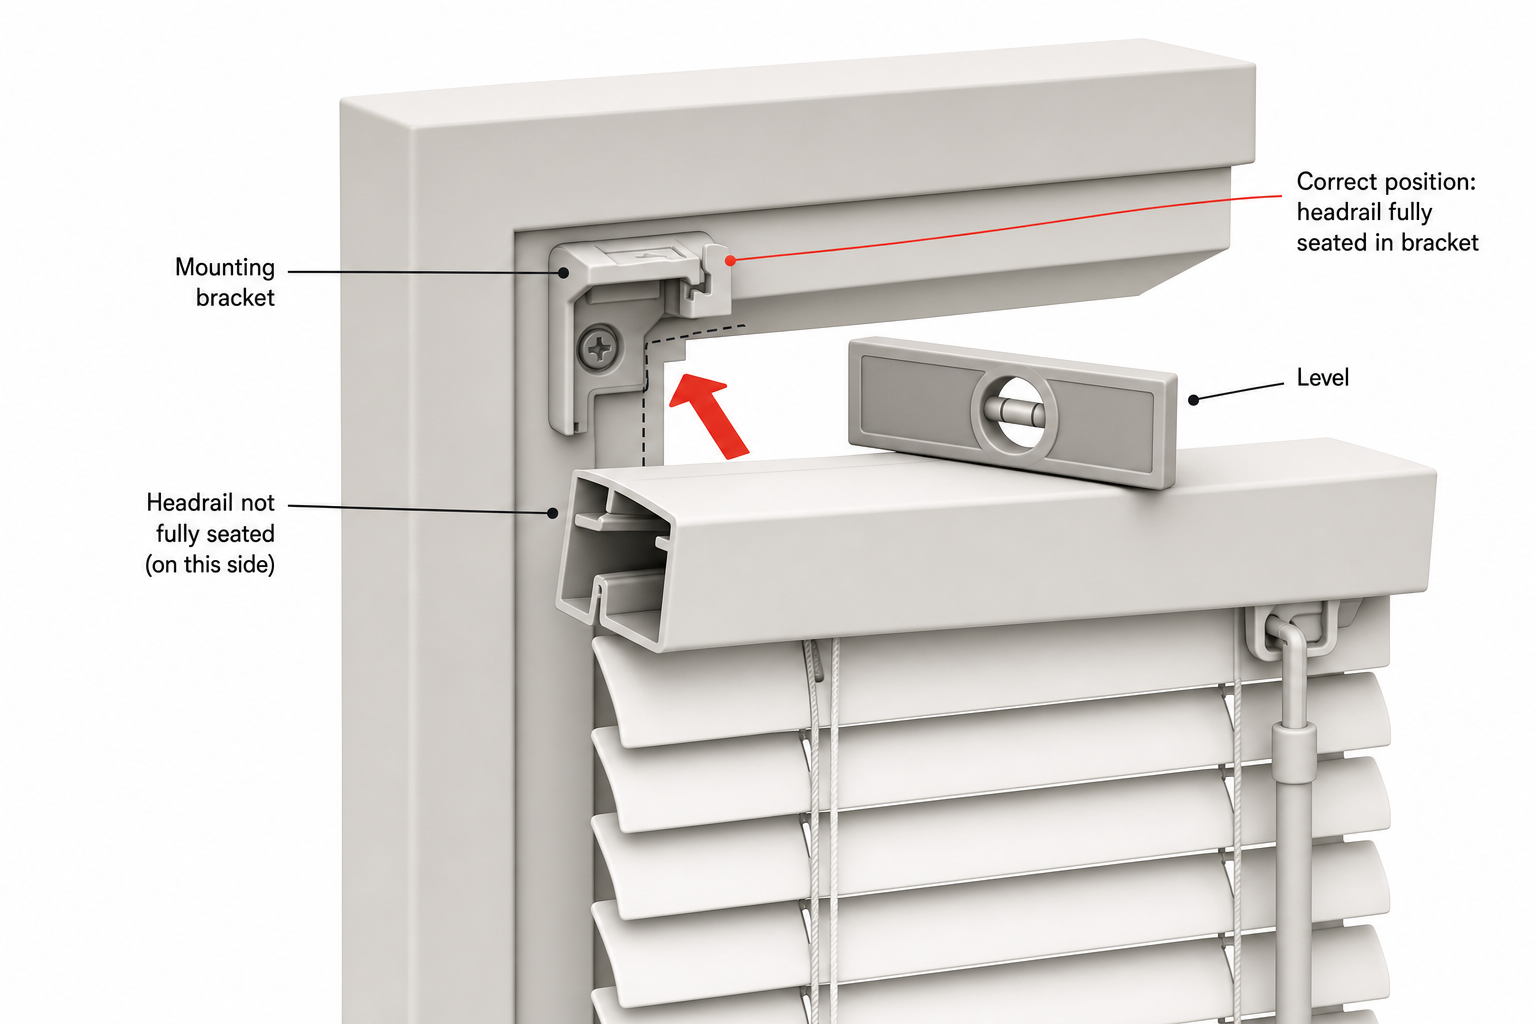
Before touching cords or lift mechanisms, confirm the headrail itself is level and firmly seated. A surprising number of "crooked blind" complaints are actually a bracket problem.
- Look at both end brackets and any center support bracket. The headrail should click or snap fully into each one — if one side is only partially seated, that side will sag.
- Use a level held against the bottom of the headrail (not the bottom rail of the blind, which can be uneven on its own). If the headrail itself is tilted, loosen the screws on the higher-side bracket, nudge it down slightly, and re-tighten.
- Check that both brackets are mounted into solid material — wood jamb, stud, or a drilled-and-anchored point in drywall or masonry. A bracket screwed only into drywall paper will slowly pull loose under the weight of the headrail, causing a slow drift to one side over months.
- If a screw hole has stripped out, back the screw out, fill the hole with a wood toothpick or matchsticks and a dab of wood glue, let it dry, then re-drive the screw into the plug. For repeated failures in drywall, switch to self-drilling drywall anchors rated for the weight of the blind.
Step 2: Fix Uneven Cord Tension on Mini and Horizontal Blinds
Once brackets are confirmed level, most remaining crookedness in horizontal (venetian-style) mini blinds comes down to the lift cords being unevenly threaded through the slats after repeated raising and lowering.
- Raise the blind fully so the bottom rail sits against the headrail.
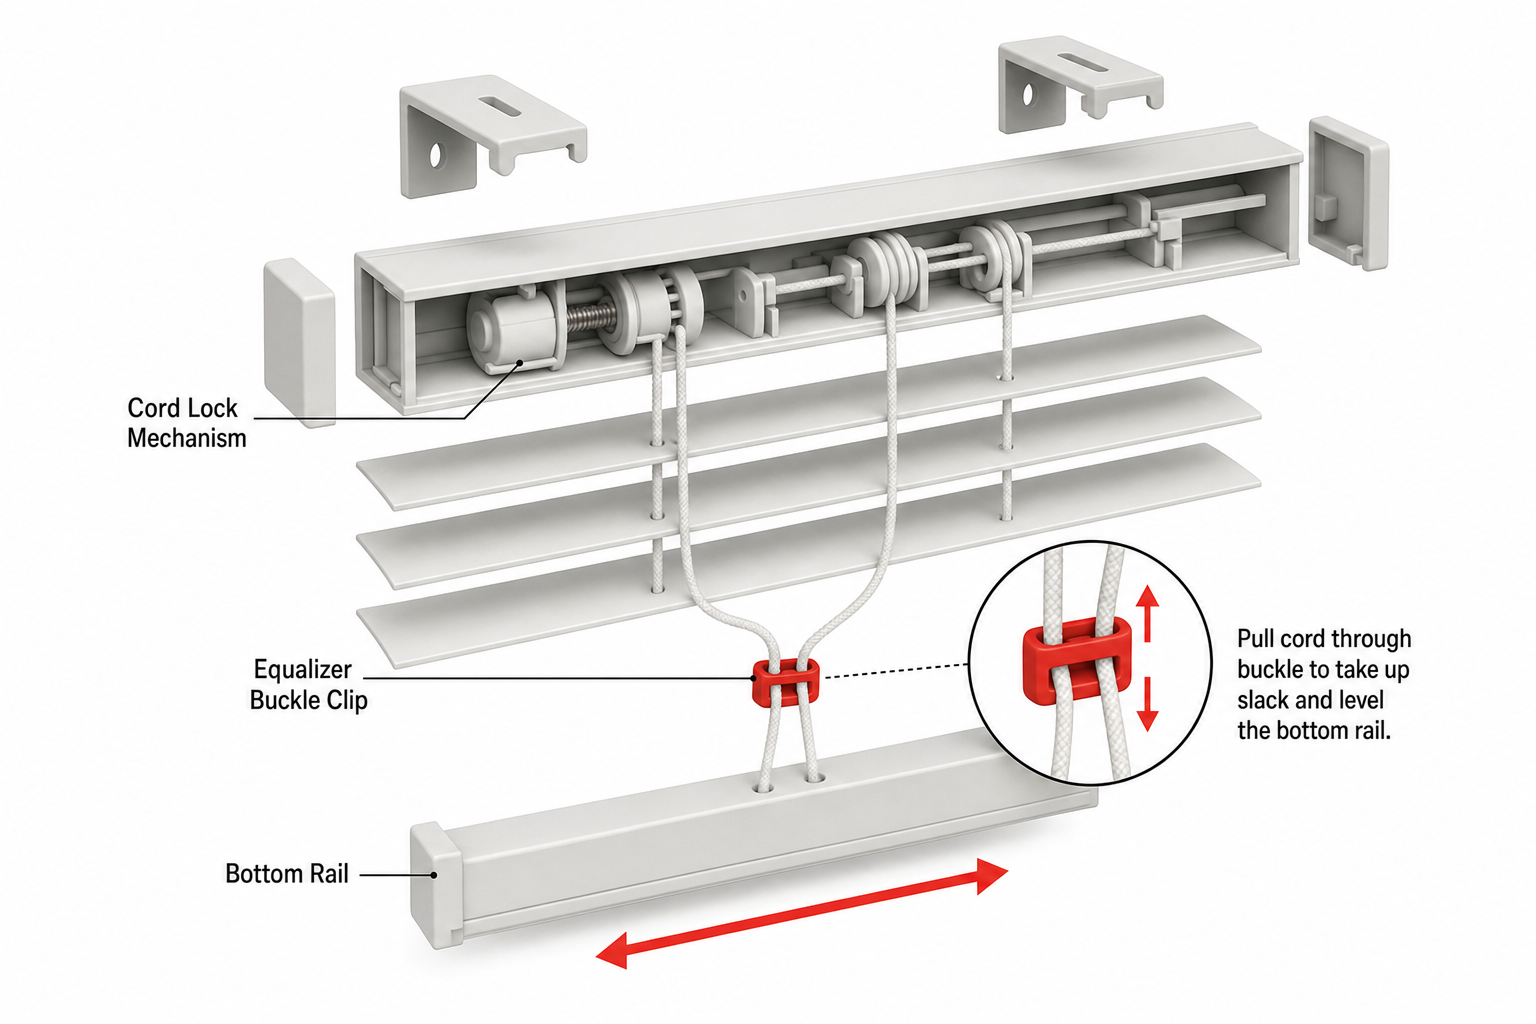
- Locate the cord lock mechanism, usually on one side of the headrail where the pull cords exit.
- Gently pull the headrail cover off (most snap or slide off) to expose the cord lock and equalizer buckle — a small plastic clip partway down the cord where the two cord strands meet.
- Loosen or slide the equalizer buckle and pull the shorter cord strand through it until both sides of the bottom rail hang level. Work slowly; pulling too hard can pull the cord back through the lock mechanism entirely.
- Once level, re-tighten or reposition the equalizer clip so it holds the new balance, and snap the headrail cover back on.
- Test by raising and lowering the blind fully several times. If one side consistently drops again, the cord lock's internal cam may be worn, which usually means cord replacement or a full lift-mechanism swap rather than a tension fix — the recommendations below include suitable repair kits for this.
Step 3: Fix a Slipped or Sticky Tilt Mechanism
If the slats themselves tilt unevenly — some slats angled differently than others, or the whole blind won't tilt fully closed on one pull of the wand — the tilt mechanism inside the headrail is usually the cause.
- For wand-tilt blinds, check that the tilt tube (the rod running the length of the headrail that the slats' ladder cords hook onto) is turning freely. Remove the headrail cover and spin the wand by hand while watching the tube — if it binds or catches partway, dust and old lubricant buildup inside the tilter gearbox is a common cause.
- Apply a small amount of silicone-based lubricant (not household oil, which attracts dust and gums up over time) to the tilter gears and tube ends, then work the wand back and forth to distribute it.
- For cordless or wand blinds with a worn tilter gearbox — a common failure point after several years of daily use — the plastic gear teeth can strip, causing the tilt to feel loose or only partially respond. This isn't something you can re-machine; replacement tilter units are inexpensive and sold to match common headrail sizes, covered in the recommendations below.
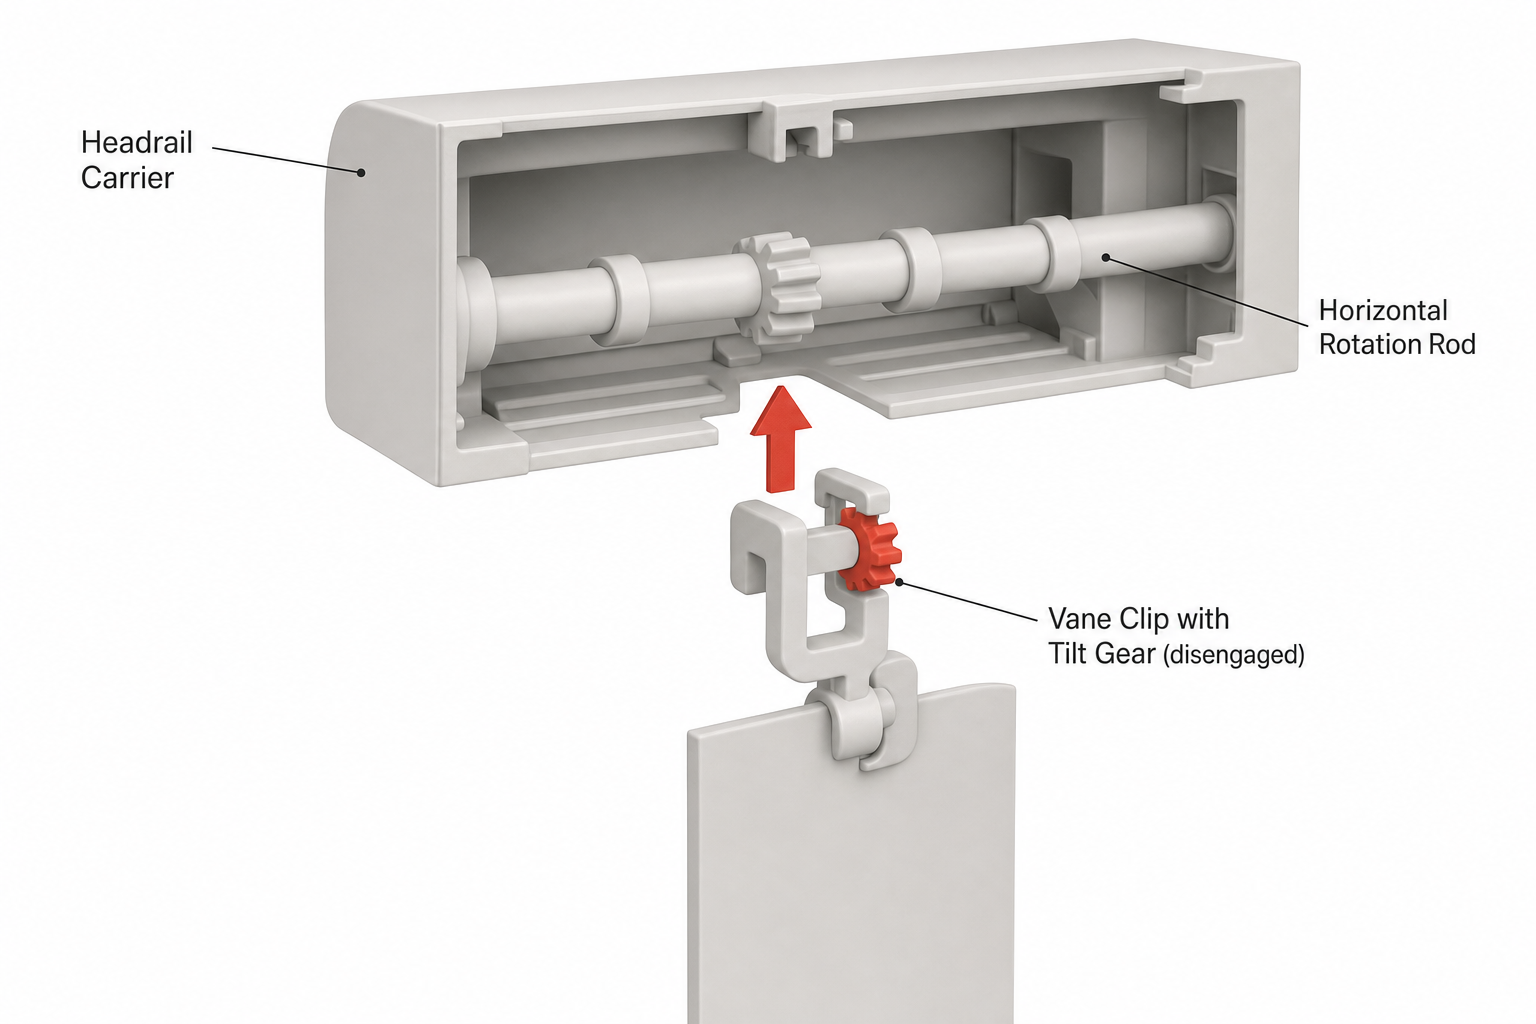
- For vertical blinds, the equivalent part is the tilt/rotate mechanism in the headrail carrier that turns the vanes. If vanes rotate unevenly, check that each vane's tilt gear (a small plastic cog inside the top clip) is properly engaged on the rotating rod that runs the length of the headrail; a disengaged gear will leave a single vane out of sync with the rest.
Step 4: Level Individual Vertical Blind Vanes
Vertical blinds have their own specific quirks separate from horizontal mini blinds, since each vane hangs independently from its own carrier.
- If one or two vanes hang lower than the rest, unclip the vane at the top (most snap into a rotating clip) and check the clip for cracks or a broken tab — a common failure after a vane has been caught or tugged.
- Check the bottom weight chain or individual weights sewn or clipped into the hem of each vane. If a weight has shifted, fallen out, or a link in the connecting chain has come loose, that vane will hang unevenly and may swing more than its neighbors.
- Re-string the connecting chain through the guide holes at the bottom of each vane, making sure it isn't twisted, and reconnect any detached end clip.
- Wipe vanes down before rehanging — a buildup of dust or grease on fabric vanes changes their weight distribution slightly and can affect hang over time, especially near kitchens.
Step 5: When to Call a Professional
Most uneven blinds are fixable with the steps above, but a few situations are worth handing off:
- A headrail that's visibly warped or bowed, rather than just unevenly hung — this usually means the blind was cut too long for the window or has been damaged, and a replacement or professional refit is more reliable than a repair.
- Motorized or smart blinds where the tilt or lift motor itself is misbehaving. These involve low-voltage wiring and sealed gearboxes not meant for home disassembly; a technician familiar with the specific motor system is the safer route.
- Blinds mounted above stairwells or other hard-to-reach high spots. Working at height on a ladder to fix a bracket or cord is a common source of falls; if you don't have secure, stable footing, it's worth paying a professional installer rather than risking it.
FAQ
Why does only one side of my mini blind keep dropping lower than the other? This is almost always the lift cord equalizer clip slipping out of balance from repeated use, or the cord lock's internal cam wearing down. Re-leveling the equalizer buckle inside the headrail (Step 2) fixes most cases; if it recurs within days, the cord lock itself likely needs replacing.
Can I fix a broken tilt wand mechanism myself, or do I need a new blind? In most cases you can replace just the tilter unit inside the headrail rather than the whole blind — it's a small, inexpensive part sized to common headrail widths, and swapping it usually takes removing two screws and reconnecting the tilt cord or tube.
My vertical blind vanes twist and don't all face the same direction — what's wrong? Usually a tilt gear inside one or more vane clips has disengaged from the rotating rod in the headrail. Reopening the clip and re-seating the gear onto the rod (Step 3) typically resolves it without needing new parts.
Is it normal for blinds to need this kind of adjustment over time, or does it mean they're defective? Cord stretch, dust buildup in tilters, and gradual bracket loosening are normal wear from daily raising, lowering, and tilting, and most blinds will need this kind of tune-up at some point in their service life rather than it indicating a manufacturing defect.
How do I know if it's the bracket or the blind itself causing the crooked look? Hold a level against the headrail, not the bottom rail. If the headrail is level but the blind still looks crooked, the problem is in the cords, tilter, or vanes; if the headrail itself is tilted, start with the bracket fix in Step 1.