A door that drags across the floor or won't latch cleanly is one of the most common complaints in older and newer houses alike. The tricky part isn't the fix itself, most of these repairs take under an hour, it's figuring out which of three unrelated problems you're actually dealing with. Plane down the wrong spot and you'll gouge good wood while the real gap stays open. This guide walks through how to read the symptoms, then how to fix a sticking door with the tool that actually matches the cause.
Step 1: Read the Rub Marks Before You Touch a Tool
Close the door slowly and watch where it drags. Open it and look for shiny or scuffed marks on the door edge or the jamb, that's your contact point. Then check these three things in order:
- Does the door stick worse in summer or after rain, and swing free in winter? That points to wood swelling from moisture.
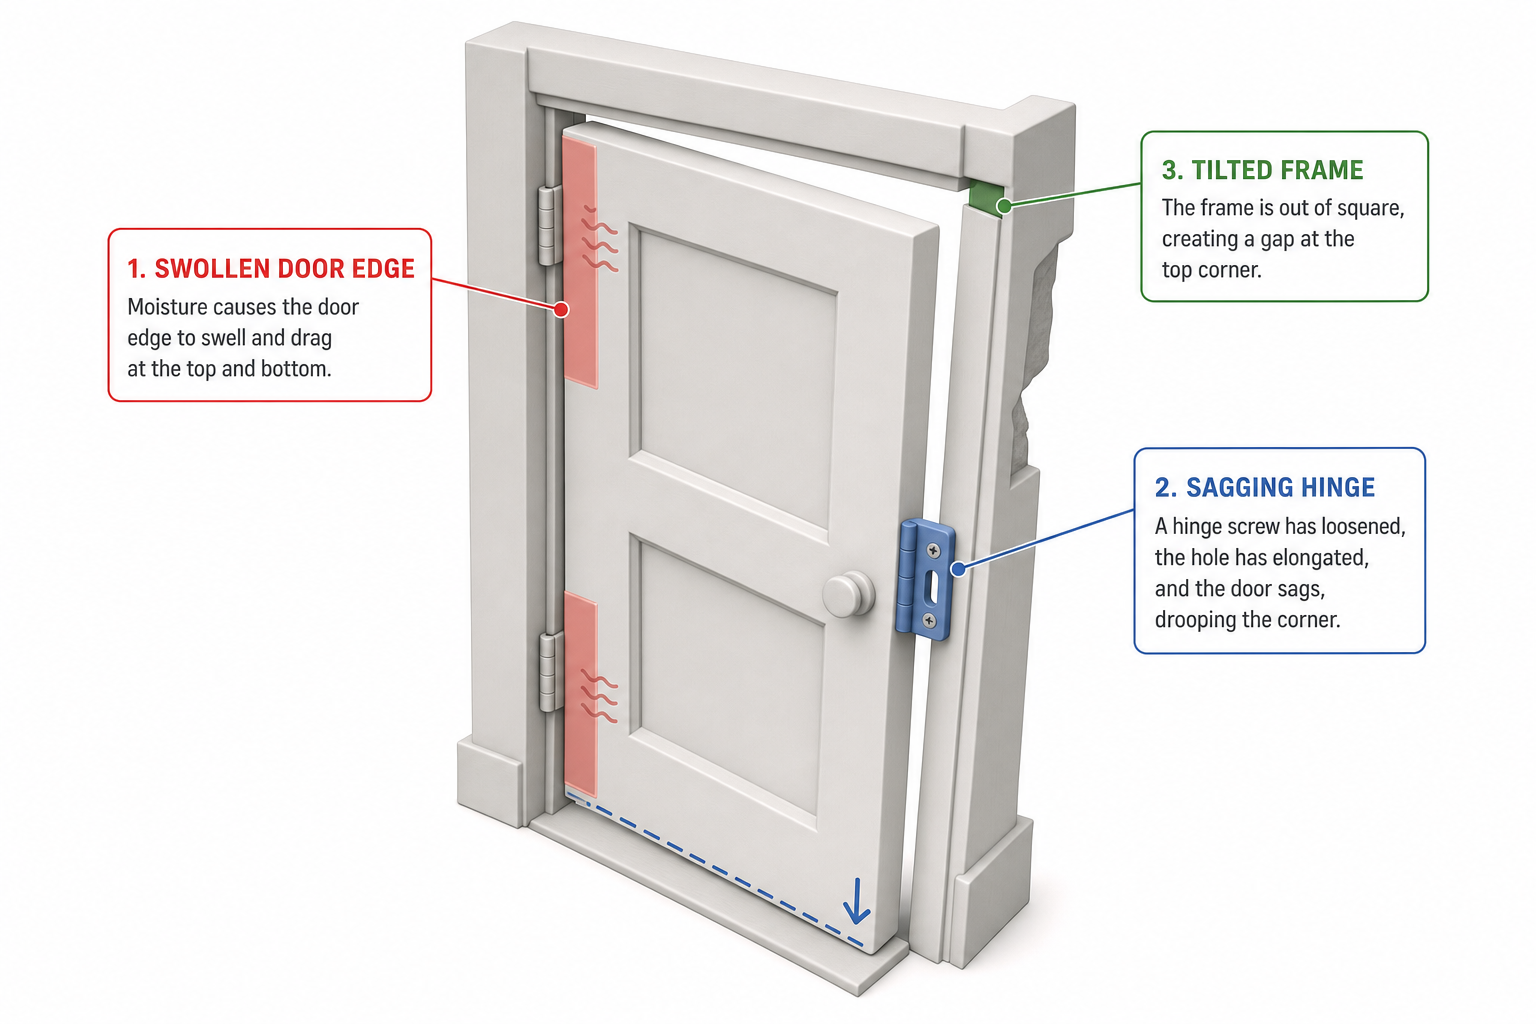
- Does the door drag along the bottom corner nearest the hinges, and does the top corner on the opposite side gap open? That's classic hinge sag.
- Does the whole door frame look slightly out of square, with a wider gap at the top on one side and none on the other, or cracks in the wall nearby? That suggests the frame or the house structure has shifted.
Most sticking doors are one of these three, and sometimes two at once. Diagnosing correctly first saves you from removing wood you'll wish you had back.
Cause 1: Humidity Swelling
Wood is hygroscopic, it absorbs moisture from the air and expands across its grain. A door that binds only during wet weather or humid seasons and swings freely once things dry out is almost always swelling, not a structural problem.
How to fix it:
- Wait for a dry day if you can. Chasing a fix during a humid stretch can lead to overcorrecting, and the door will feel too loose once the wood shrinks back in winter.
- Close the door and mark the rub line with a pencil, held flat against the frame while you trace along the sticking edge.
- Remove the door by tapping out the hinge pins with a hammer and a nail set, starting with the bottom pin.
- Clamp the door on its edge and use a hand plane to shave the marked line. Set the plane for a light cut and work with the grain, taking thin passes rather than one deep one. A rented or borrowed power planer works too for a door that needs more than a light skim.
- Re-hang the door, check the fit, and repeat lightly if needed.
- Seal the freshly planed edge with paint or varnish before rehanging. Bare wood absorbs moisture fastest at cut edges, and sealing it is the single best way to stop the swelling cycle from repeating next year.
[!region] Humidity swelling is more frequent in climates with hot, humid summers and colder, drier winters, since the seasonal moisture swing is larger. If you live somewhere with a stable humidity level year-round, recurring seasonal sticking is less likely and you should look harder at hinges or the frame instead.
Cause 2: Sagging Hinges
Over years of use, the screws holding the top hinge to the jamb can work loose in the wood, especially if the original screws were short. The door's weight then pulls the whole slab down and toward the strike side, which drags the bottom corner and opens a gap at the top.
Check this by opening the door halfway and grabbing the outer edge, then gently lifting and lowering it. Visible play, or a hinge leaf pulling away from the jamb, confirms sag.
How to fix it:
- Tighten every hinge screw first. If a screw spins without biting, the pilot hole has stripped out.
- For a stripped hole, remove the screw, dip wooden matchsticks or toothpicks in wood glue, pack them into the hole, and let the glue cure for a day before reinstalling the same screw.
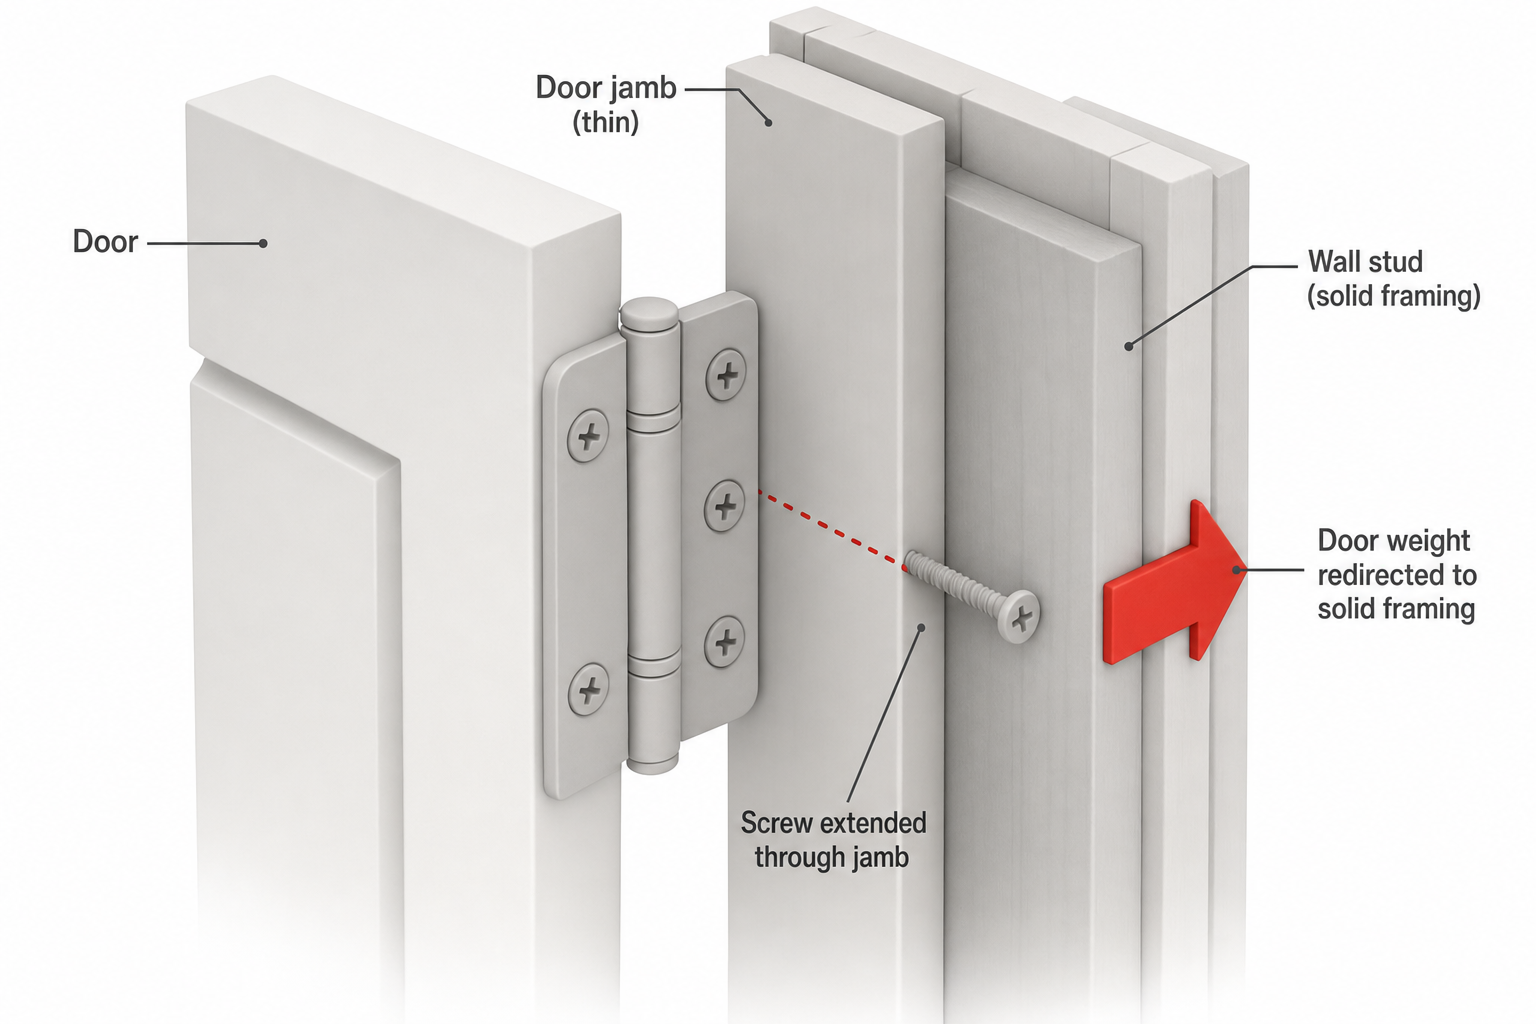
- For a more lasting repair, replace at least one screw per hinge leaf with a longer one, around 3in, that reaches through the jamb and into the framing stud behind it. This is the classic "long screw trick" and it pulls the whole hinge (and the door's weight) back against solid framing instead of just the thin jamb material.
- If a hinge leaf itself is bent or the pin is worn loose, replace the hinge rather than patching it. Match the size and swap one at a time so the door stays supported by the other two hinges while you work.
- Recheck the door swing and the gap around all four edges once all hinges are secure.
A cordless drill with a spare set of hex or square bits makes this a five-minute job per hinge; see the recommendations below for a driver that handles both.
Cause 3: Frame or Structural Shift
If the door binds along a diagonal, sticking at the top corner on one side and the bottom corner on the other, with an uneven gap all around, the frame itself has likely racked out of square. This can come from a house settling normally over decades, from a foundation issue, or from a header that's carrying more load than it was sized for.
A quick check: hold a level against the door jamb on both sides. If one side reads noticeably out of plumb, or if you see new drywall cracks radiating from the corners of the doorway, the frame has moved.
Small seasonal racking can sometimes be planed around the same way as a swelling door, shaving a bit more off the binding corner. But if the gap is large, growing over time, or paired with sloping floors or cracked masonry nearby, that's a structural signal, not a carpentry one.
[!safety] Do not try to "square up" a frame by prying, shimming under the house, or cutting into load-bearing framing yourself. Structural shifts can involve foundation settlement or a compromised header, and misdiagnosing the cause can make things worse or mask a bigger problem. Call a licensed contractor or structural professional to inspect the framing if you see progressive racking, sloping floors, or new cracks.
Other Quick Checks Before You Start Planing
A few low-effort fixes solve sticking doors that have nothing to do with wood movement or hinges at all:
- Loose or missing weatherstripping on an exterior door can shift the door's resting position enough to bind against the strike plate. Check it before you plane anything.
- A strike plate that's slightly misaligned, often from paint buildup or a shifted jamb, can make a door feel like it sticks when it's really just missing the latch. Loosen the plate's screws, nudge it into alignment with the latch, and retighten.
- Multiple coats of paint on the door edge or jamb can add real thickness. Score the paint line with a utility knife before planing to get a clean edge instead of tearing chips out of dried paint layers.
FAQ
How much wood should I remove when planing a sticking door? Take thin, even passes and recheck the fit after each one. Most swelling problems need only a few light passes along the marked rub line, not a deep cut. Removing too much in one go is the most common mistake, and it leaves a permanent gap once the wood dries out and shrinks back.
Will a sticking door fix itself once the weather changes? Often yes, if humidity swelling is the only cause. If the door still sticks in dry weather, or the sag or gap pattern looks the same year-round, hinges or the frame are involved and won't resolve on their own.
Can I fix a sticking door without removing it from the hinges? Minor planing on the bottom edge or light hinge adjustments can sometimes be done with the door in place, but planing a side edge is far easier and more accurate with the door off and clamped flat on a workbench or sawhorses.
Is it normal for an exterior door to feel tighter than an interior one? Some difference is expected. Exterior doors are typically thicker, often 1.75in versus a thinner interior slab, and they're exposed to more direct weather on one face, so slightly more seasonal movement is normal.
What clearance should a properly fitted door have around the frame? Most carpenters aim for roughly 0.13in to 0.25in of even clearance along the top and sides, with a bit more at the bottom for flooring and a threshold. If your door is noticeably tighter or looser than that all the way around, something beyond simple wear is likely going on.