If your toilet runs constantly, refills randomly with no one home, or makes a high-pitched whine while filling, the fill valve is almost always the culprit. This is one of the most beginner-friendly plumbing repairs in the house — no soldering, no special skills, and most swaps take less than 45 minutes once the water is off. Here's how to replace a toilet fill valve step by step, with the tools you actually need and the small details that trip people up.
What a Fill Valve Does (and Why It Fails)
The fill valve is the tall assembly on the left side of most toilet tanks. It refills the tank after each flush and shuts off once the water reaches the fill line. Over years of use, the internal seals and the float mechanism wear out, mineral deposits from hard water build up inside the valve, or the small rubber diaphragm cracks. Any of these can cause a toilet to run continuously, hiss intermittently, or refill louder than it used to.
Tools and Parts You'll Need
- A replacement fill valve (most modern universal valves adjust to fit tank heights roughly 9" to 14")
- Adjustable wrench or channel-lock pliers
- A small bucket, towel, or large sponge
- A cup or turkey baster for removing residual tank water
- Scissors or a utility knife (to trim the valve to height, if needed)
- Plumber's tape (optional, for the supply line connection)
- Old towels to protect the floor
Most of what you need is inexpensive and widely available — see the recommendations below if you want to compare specific fill valve types before you shop.
Step 1: Shut Off the Water and Drain the Tank
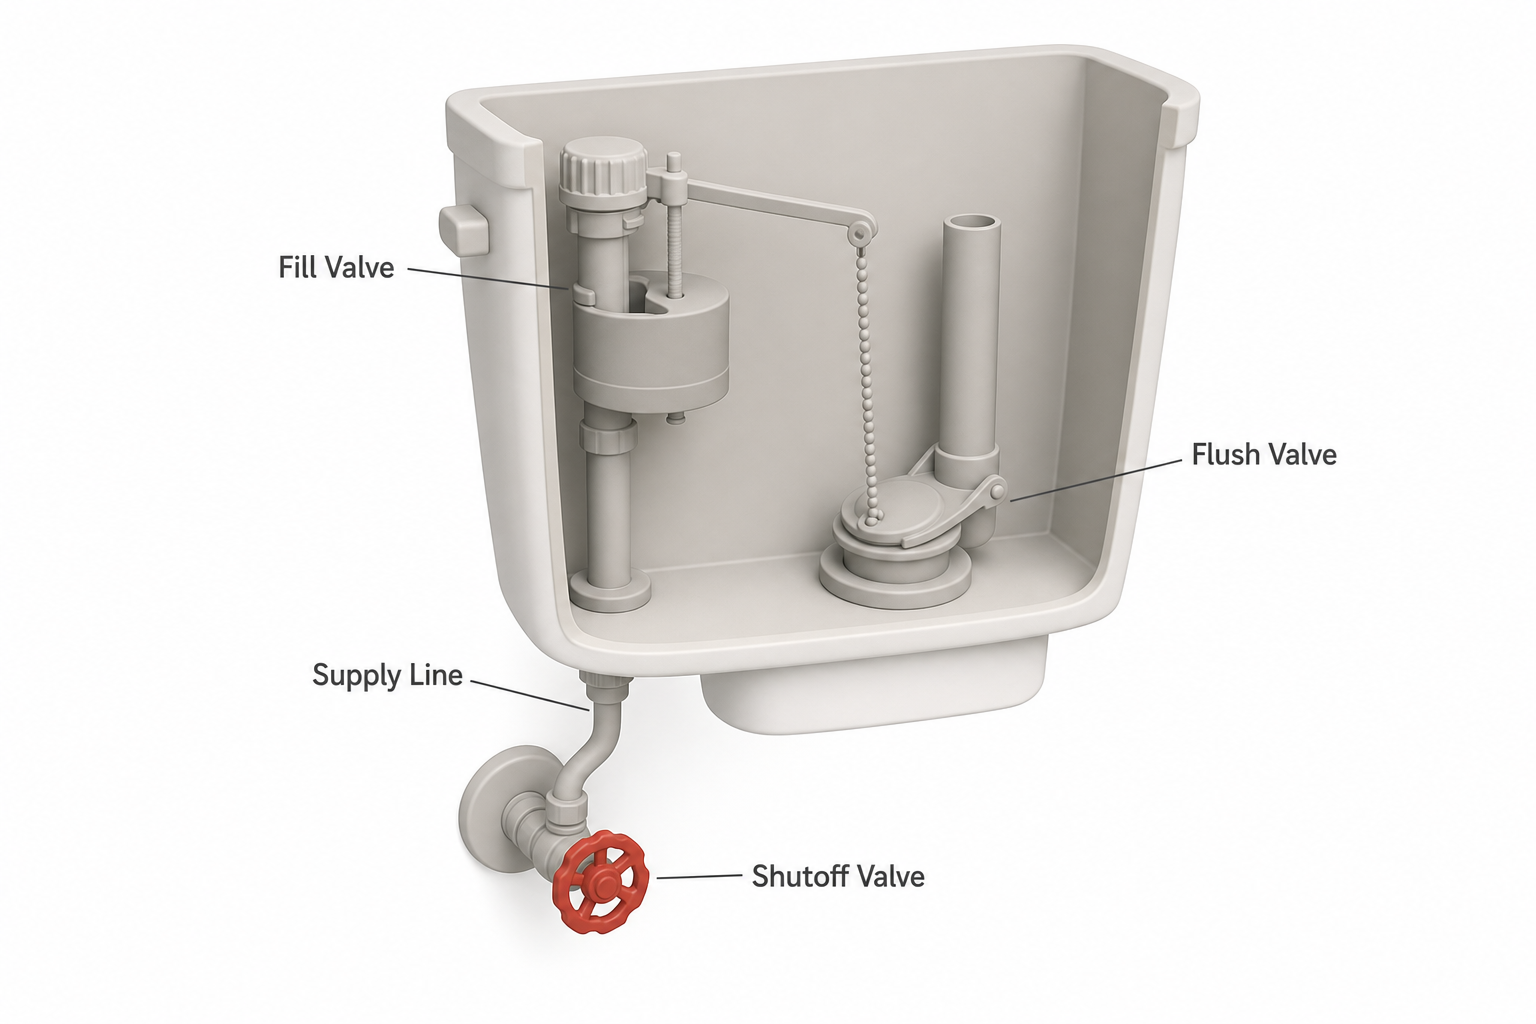
Locate the shutoff valve behind or beside the toilet, usually low on the wall or coming up from the floor. Turn it clockwise until it stops. Flush the toilet and hold the handle down to drain as much water from the tank as possible, then use a cup or sponge to soak up what remains. You want the tank essentially dry before disconnecting anything.
Step 2: Disconnect the Supply Line
Using your adjustable wrench, loosen the coupling nut connecting the water supply line to the bottom of the fill valve, located under the tank. Have your bucket or towel ready — some water will still drip out. Once loose, set the supply line aside.
Step 3: Remove the Old Fill Valve
Reach inside the tank and hold the fill valve steady with one hand while you loosen the large locknut underneath the tank with the other. This nut can be tight or slightly corroded; channel-lock pliers give you more grip than a wrench in tight spaces. Once it's off, lift the old fill valve straight up and out of the tank.
Inspect the rubber washer or gasket that sits under the tank at the valve's base — you'll reuse a similar seal with the new valve, but check the tank's inner surface for mineral buildup or cracks in the porcelain while it's exposed.
Step 4: Set the Height and Install the New Valve
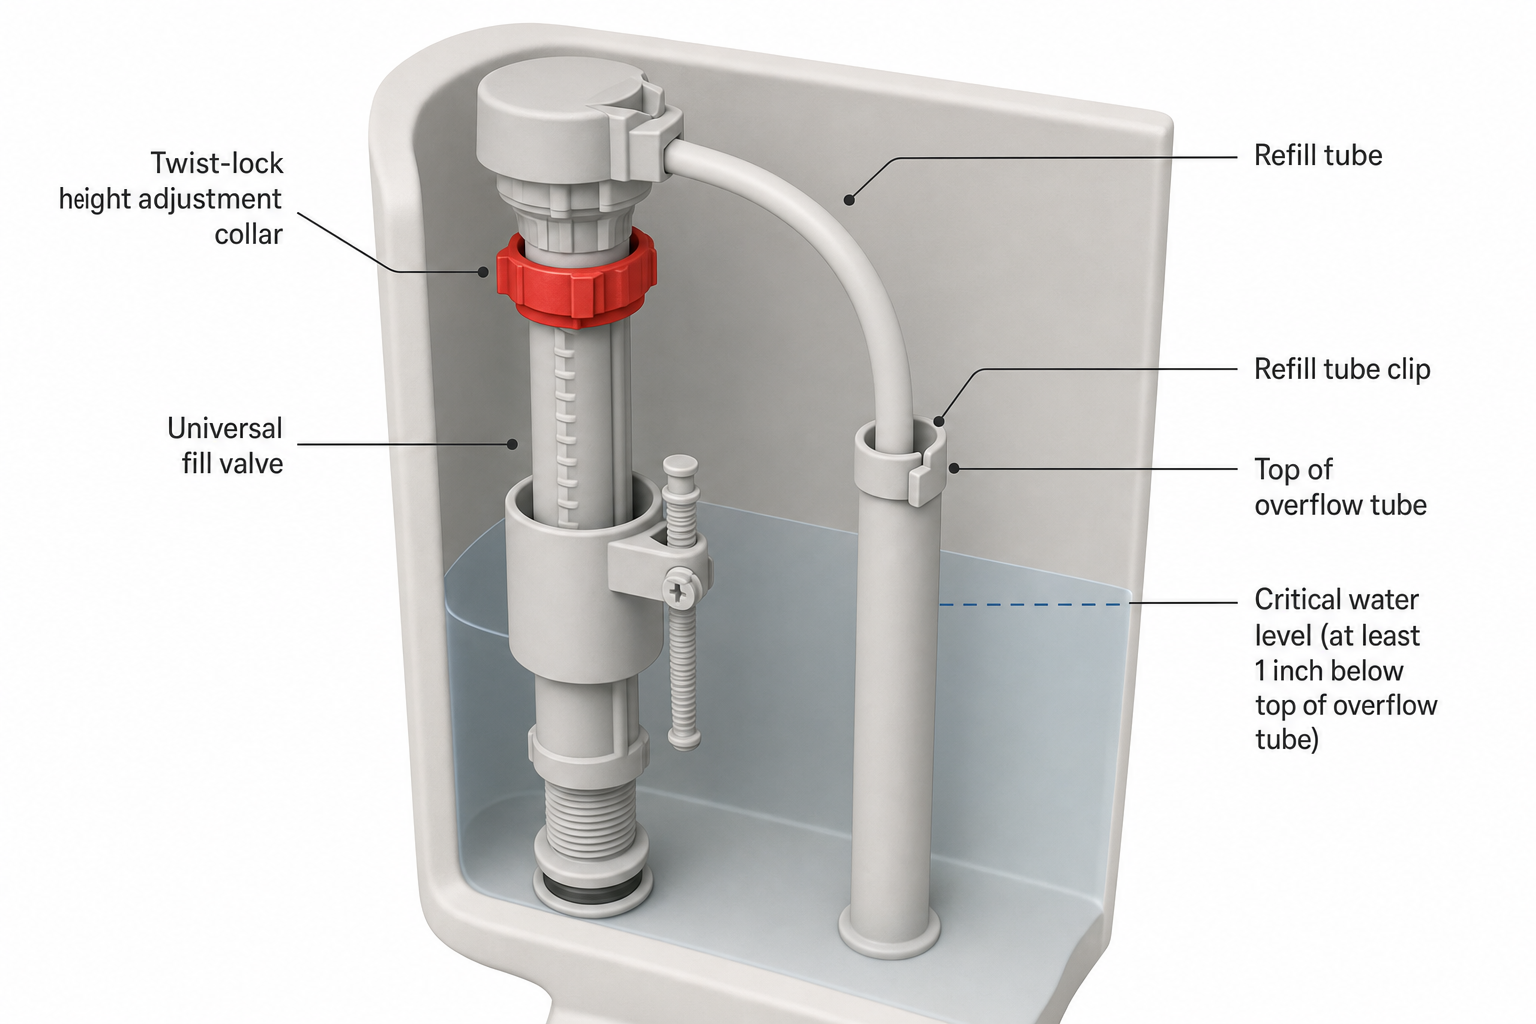
Most universal fill valves have an adjustable shaft — either a twist-lock collar or a squeeze-tab mechanism — that lets you set the height so the critical water level marker sits at least 1 inch below the top of the overflow tube. Check the packaging instructions for your specific valve, since adjustment methods vary between designs.
Place the new rubber washer onto the shaft, then lower the valve into the tank's mounting hole from inside. From underneath, hand-tighten the locknut, then snug it about a quarter turn with pliers — don't overtighten, as cracking the plastic threads or the tank itself is a real risk.
Step 5: Reconnect the Supply Line and Refill Tube
Reattach the supply line coupling nut to the base of the valve and hand-tighten, then give it a quarter turn with the wrench — snug, not forceful. A wrap of plumber's tape on the threads can help prevent leaks but usually isn't required if the washer inside the nut is in good shape.
Clip the small refill tube (the flexible hose coming off the top of the fill valve) into the overflow tube opening, ideally using the plastic clip that keeps it angled above the waterline. This tube sends a small stream of water to refill the bowl after each flush — if it dangles below the waterline, it can cause siphoning problems.
Step 6: Turn the Water Back On and Test
Open the shutoff valve slowly and watch the supply line connection and the base locknut for drips. Let the tank fill completely. It should shut off cleanly once it reaches the fill line, without hissing, sputtering, or continuing to trickle.
Flush the toilet once fully assembled and watch a complete cycle: the tank should drain, the valve should kick on, refill smoothly, and shut off on its own within 30–60 seconds for most residential toilets. Adjust the height dial or float if the water level is too high (close to the overflow tube) or too low (weak, slow refill).
Troubleshooting After Installation
- Still running after install: the flapper on the flush valve (not the fill valve) may be the actual problem — check that it's seating fully and isn't warped or cracked.
- Water level too high: adjust the fill valve's height mechanism down, or check that the water level is set at least 1 inch below the overflow tube as required by most manufacturers.
- Leak at the base: turn off the water and check that the locknut is snug and the rubber washer is properly seated; over-tightening plastic threads can also cause cracks that leak.
- Noisy filling: some valves have a small adjustment screw or need the supply line valve opened more fully to prevent whistling.
FAQ
How do I know if it's the fill valve or the flapper causing my toilet to run? Drop a few drops of food coloring into the tank without flushing. If color appears in the bowl within 10–15 minutes without flushing, the flapper is leaking. If the tank keeps making refill sounds or never fully shuts off, the fill valve is the likely cause.
Can I replace a toilet fill valve without turning off the main water supply? Usually yes — the shutoff valve at the toilet is sufficient. You only need to use the main shutoff if that local valve is broken or won't fully close.
Do all fill valves fit all toilets? Most modern universal fill valves adjust to fit a wide range of tank heights and are designed to work with most standard two-piece toilets. Older or unusually shaped tanks, including some one-piece or low-profile designs, may need a specific valve type — check your toilet's tank height and shape before buying.
How long does a fill valve typically last? Lifespan varies with water quality and usage, but many fill valves last several years before mineral buildup or worn seals cause problems, especially in areas with hard water.
Is it normal for the toilet to make noise for a few minutes after installing a new fill valve? A brief hiss or gurgle during the first fill cycle is common as air works out of the supply line. Ongoing noise after several flushes usually means the valve needs a height or angle adjustment.